CV, CALENDAR, RESUME, LETTERS TEMPLATES

 
Showing posts with label SIDE DISHES. Show all posts

HOMEMADE TATER TOTS

If you are a tater tot fan, you will adore these homemade tots. If you are NOT a tater tot fan, you WILL be after you try these, they are THAT good!!

It isn't accurate enough to just say these homemade tots are better than commercial tater tots .... it is more accurate to say they are worlds above commercial tater tots, and very easy to make.


2 pounds Russet potatoes
1 tablespoon flour
1/4 teaspoon garlic powder (not garlic salt)
1/2 teaspoon onion powder
1/4 teaspoon oregano
1/2 teaspoon chili powder
1/2 teaspoon salt
1/4 teaspoon pepper
1 cup vegetable oil (for frying)

Wash and peel the potatoes (leave whole) and put them in a pot of cold water on high heat.

 
As soon as it comes to a boil, turn heat down to medium high and boil for 6 minutes (they will not be cooked all the way through).

Remove the potatoes from the hot water and drain on a towel. Cool to room temperature (takes about 30 minutes) (important step).

Grate partially cooked (and cooled) potatoes with a box grater.


Mix the flour and seasoning together. Spread the grated potatoes out a little and evenly sprinkle with four-spice mixture. Gently toss with two forks. The potatoes will seem a little dry, but that OK, it's the way you want them.

Heat 1 cup of oil to 375° (I use my electric skillet) and squeeze a small handful of seasoned potatoes in your hand until you get a nice little nugget. I couldn't get them round, but that's OK.

Fry about 2 to 3 minutes per side, depending on how big or small your nuggets are (don't crowd the tots, just fry a few at a time). Turn them over when they get nice a golden.

Drain on paper towels and sprinkle with kosher salt.
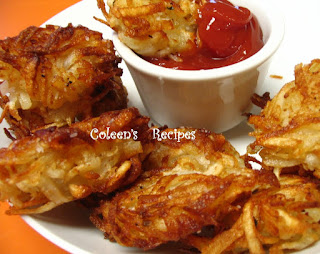
ENJOY !!!

BRUSSELS SPROUTS AU GRATIN

This is a wonderful recipe for a special occasion. Roasted Brussels sprouts, cheese and bacon, what could be better?  Even people who aren't sprout lovers, enjoy this easy dish!!


2 pounds small, tender Brussels sprouts (washed and cut in half)
4 ounces of thick cut bacon chopped
1 cup chopped sweet onion (like a Vidalia)
1 tablespoon butter
3 tablespoons flour
1/2 cup chicken broth
1 1/2 cups milk
1/4 teaspoon black pepper
6 ounces Gruyere cheese shredded (about 1 cup packed)

Coat the sprouts with vegetable (or olive) oil and place, face side down on baking sheet. Bake in preheated 425° oven for 20 minutes (turning over about half way through). Remove from oven and set aside.

In frying pan, brown the bacon until crisp, drain on paper towels.

In bacon grease, sautee onions until tender and sweet smelling (about 3-4 minutes).

Drain all but 2 tablespoons of fat from the pan. Sprinkle in the flour and pepper and stir around. Let this gently cook for a minute or so, to cook out any raw flour taste.

Whisk in the chicken broth and milk. Stir/whisk until it's nice and thick, then stir in 1/2 of the grated cheese and stir till melted.

Add the cooked Brussels sprouts and gently toss to coat. Place in greased baking dish and top with the rest of the cheese.

Bake 25 minutes. Let sit for 10 minutes before serving.

ENJOY !!!


MAC and CHEESE BITES

This is such a fun (and easy) recipe. It is great for kids parties or teen parties and you can even jazz them up for adult appetizers. They stay warm for quite a while, but are even tasty at room temperature (nice and creamy).

Mildly seasoned for picky toddlers (perfect size), or add a little zip by using half cheddar and half pepper jack cheese and/or bacon bits.

1/2 pound elbow macaroni
2 tablespoons butter
2 tablespoons flour
1  1/2 cups milk
2 cups shredded sharp cheddar cheese (divided)
2 ounces cream cheese
1/2 teaspoon salt
1/4 teaspoon pepper
small pinch of cayenne
1 beaten egg

Boil the elbow macaroni in SALTED water for 8 minutes, then drain and set aside. Preheat oven to 400° and spray MINI muffin pan with cooking spray.

Note: Salting the water is important. If you don't you will have to increase the amount of salt in the sauce.


In medium size pan, melt butter and stir in flour until smooth and bubbly, let it simmer for about 30 seconds or so.

Slowly add the milk (whisk while you add it) and bring it to a simmer (it will thicken just a little).

Stir in 1 1/2 cups of the cheese (set aside the other 1/2 cup) and add the cream cheese, salt, pepper and cayenne. Stir to melt.

Mix the cooked macaroni, the cheese sauce and the beaten egg. Spoon mac and cheese into greased mini muffin cups and top with just a few shreds of the remaining cheddar cheese.

Bake at 400° for 15 minutes.  IMPORTANT: Let cool for 5 minutes before you take them out of the pan.

NOTES: I cook mine for 14 minutes, then put them under the broiler for the last minute (but watch them so they don't over brown).

NOTES: If you like a little spice, use half shredded sharp cheddar cheese and 1/2 pepper jack cheese.

NOTES: You can even sneak in some finely chopped broccoli for color.

 
This recipe makes about 4 dozen mini bites
 
 
ENJOY !!!
 
Original recipe found at www.chef-in-training.com   (and adapted by Coleen's Recipes)

BACON HASSELBACK POTATOES

As I understand it, Hasselback potatoes originated in Sweden as far back as the 1700's and there are a lot of variations. Basically it is an unpeeled baking potato that has been partially sliced, buttered and baked. The outside is crispy, salty and chewy but the inside of the potato is smooth and moist. They are very easy to make, delicious to eat and pretty enough to serve over the upcoming holidays.

A word of warning about these photographs: I didn't realize that the photos were on the blurry side until we finished dinner, so I couldn't re-take them. Sorry about that.

 
This version has bacon in it !!
 
There really isn't a specific recipe, but I do have a few tips that will help you in the process.

Things to do ahead of time: 

Lay 1 strip of good quality smoky THICK bacon (for every 2 potatoes) on a flat surface and freeze for about 30 minutes. This will help you slide the bacon down into the cuts of the potato.

Use meaty bacon

Bring a pot of water (large enough to hold the potatoes) to a full boil.

Wash the unpeeled potatoes, scrubbing them with a vegetable brush, then drying them with a paper towel.

Next, it's time to cut the slices into the potato. Because it is easy to cut too far, it's better to use some sort of cutting depth guide. Personally, I lay the potato between 2 spoon handles and use a sharp (thin bladed) knife to cut down only as far as the spoon handles.

 
Next, put the potatoes into the pot of boiling water. Let boil 4 minutes for larger potatoes and 2 minutes for medium potatoes. Gently lift them out and pat them dry.

Coat the potatoes with melted butter, making sure it gets down into every cut (just don't try to PRY the slices apart too much).

After you've buttered the potato, insert 3 pieces of frozen bacon (evenly spaced) into the potato. Make sure the bacon is big enough to be a little wider and taller than the potato because it will shrink as it bakes.


Butter again and then sprinkle with kosher salt and coarsely ground black pepper.

Bake at 350° (2 hours for large potatoes and 1 1/2 hours for medium potatoes). Dab them with a little butter about half way through.

The last 5-10 minutes of baking, melt a little butter and add a finely sliced green onion(optional) and half a clove of minced garlic. Let the garlic toast in the butter JUST A LITTLE, then drizzle the garlic butter over the potatoes and bake a few minutes more.

Carefully lift the potatoes out of the baking dish with a sturdy utensil.


The potatoes have a smooth and slightly smoky flavor. Picky-picky husband loved them.  Like I said, sorry about the poor quality of todays photos.

ENJOY !!

DIABETIC FRIENDLY MEXICAN QUINOA SKILLET

For those of us who have Type II diabetes, you KNOW how hard it is to find something quick, easy and tasty that won't send your glucose meter into a spin. Well, here is a recipe that is very diabetes friendly and it SCREAMS comfort food taste.

This recipe is super quick and easy to make!!  It is definitely going directly into my 5 star recipe box and I will be freezing single portions of it for my busy day quick hot lunch!!

 
This is delicious at room
temperature too !!

SPICY QUINOA

1 cup chopped sweet onion
2 cloves garlic minced
1 seeded and deveined jalapeno pepper chopped (optional)
1 cup quinoa (rinsed well and drained)
15 ounce can rinsed and drained kidney 
1  diced red bell pepper
14.5 ounce can fire roasted tomatoes (un-drained)
1  14.5 ounce can of water
1 cup corn  (I used frozen)
2 teaspoons chili powder
1 teaspoon ground cumin
1 to 1 1/2 teaspoons salt (depending on taste)
1/4 teaspoon black pepper
1/8 teaspoon cayenne pepper (see note below)
4 ounce can diced mild green chile's (un-drained)


I like making this in my electric skillet for better heat control. S

Saute the chopped onion in a tablespoon of vegetable oil until the onions are soft and starting to smell sweet. Add the garlic and saute for almost a minute (but watch so it doesn't burn).

Add everything else (except the avocado); stir well, and bring to a boil. Lower heat to a gentle simmer and put the lid on to cook for 15-20 minutes (depending on how hot your pan is).  After 20 minutes, turn heat OFF but leave lid on and let it sit for about 10 minutes.

Just before serving add:
1 peeled and diced avocado
Juice of 1 lime (optional)
2 tablespoons chopped fresh cilantro (optional)

NOTE: I usually add 1/8 teaspoon of cayenne pepper to this recipe instead of the jalapeno pepper, but then I don't care for super spicy food. That's the nice thing about this recipe...it is super adaptable.

NOTE: This freezes very well (before you add the avocado). I put it in one cup containers and freeze them.  To eat, put it in the microwave frozen and heat for 2 1/2 minutes. It makes a great lunch.

NOTE: My all time favorite way to eat this (and maybe it is just me), but I love it steaming hot, topped with a scoop of ice cold fat free cottage cheese.  Yum!!!

ENJOY !!!

Super Easy Velveeta Mac & Cheese

I know some food snobs will turn their nose up at a recipe using Velveeta cheese and that's OK, I don't use it very often either. However, Velveeta DOES make the creamiest macaroni and cheese, you have to admit it!!

A few days ago, Julie, over at Better than Burgers, posted a recipe she called KFC Mock Mac & Cheese. While I've never tried KFC mac & cheese, the recipe looked great. I made a couple of very minor changes to her recipe (and renamed it, lol). 

We loved it (and it couldn't be easier!!)


My recipe "tweaks" are in BLUE

Boil 2 cups of elbow macaroni for about 7-10 minutes (see note)
8 ounces of Velveeta cheese (see note)
1 cup shredded cheddar (I used sharp)
1/2 cup milk (I used 3/4 cup milk)
1/2 teaspoon salt  (I left this out)
1/2 teaspoon dry mustard powder  (my tweak)

Julie's recipe called for making the sauce in a pan, but I did it this way:

When the macaroni is almost done, put the Velveeta (cubed)+ the shredded cheddar + the milk and mustard powder in a microwave safe bowl. Microwave it on high for 1 minute, remove and stir.  Microwave it for one more minute and stir till smooth.

All microwaves are different, so watch yours for the final 30 seconds as to not over cook. The sauce will be very smooth.

Drain the cooked macaroni and stir into the sauce...that's all there is to it!! If you like "Velveeta Shells and Cheese" out of the box (the one with the foil pouch of cheese sauce) you will love this recipe.
NOTE: This recipe calls for 8 ounces of Velveeta cheese, fortunately, the Velveeta foil wrapper is marked in one ounce sections.
NOTE: Most elbow macaroni is boiled for about 7-8 minutes, but when I make macaroni and cheese, I like to boil the noodles an extra minute or so. It's just a personal preference.

Daily Categories

Powered by Blogger.

Blog Archive