CV, CALENDAR, RESUME, LETTERS TEMPLATES

 
Showing posts with label BREAKFAST RECIPES. Show all posts

HOMEMADE TATER TOTS

If you are a tater tot fan, you will adore these homemade tots. If you are NOT a tater tot fan, you WILL be after you try these, they are THAT good!!

It isn't accurate enough to just say these homemade tots are better than commercial tater tots .... it is more accurate to say they are worlds above commercial tater tots, and very easy to make.


2 pounds Russet potatoes
1 tablespoon flour
1/4 teaspoon garlic powder (not garlic salt)
1/2 teaspoon onion powder
1/4 teaspoon oregano
1/2 teaspoon chili powder
1/2 teaspoon salt
1/4 teaspoon pepper
1 cup vegetable oil (for frying)

Wash and peel the potatoes (leave whole) and put them in a pot of cold water on high heat.

 
As soon as it comes to a boil, turn heat down to medium high and boil for 6 minutes (they will not be cooked all the way through).

Remove the potatoes from the hot water and drain on a towel. Cool to room temperature (takes about 30 minutes) (important step).

Grate partially cooked (and cooled) potatoes with a box grater.


Mix the flour and seasoning together. Spread the grated potatoes out a little and evenly sprinkle with four-spice mixture. Gently toss with two forks. The potatoes will seem a little dry, but that OK, it's the way you want them.

Heat 1 cup of oil to 375° (I use my electric skillet) and squeeze a small handful of seasoned potatoes in your hand until you get a nice little nugget. I couldn't get them round, but that's OK.

Fry about 2 to 3 minutes per side, depending on how big or small your nuggets are (don't crowd the tots, just fry a few at a time). Turn them over when they get nice a golden.

Drain on paper towels and sprinkle with kosher salt.

ENJOY !!!

OVEN POACHED EGGS !!

A dear friend of mine, posted a video (from Foodstyle.com)about
poaching eggs in the oven and I was quite intrigued. Not only can poaching eggs, in the traditional method, be a disaster be challenging but you can only make 2-3 at a time!!

Here is what I found:

The video said to put about a tablespoon of water in each cup of a regular muffin pan, then crack an egg over the water and bake at 350° for 8 to 10 minutes.........well, that ALMOST worked.

I DID use the scant tablespoon of water, and I DID preheat my electric oven to 350°, but when I tried it using a standard cupcake (muffin) pan, the egg + water filled it to overflowing and took a full 20 minutes to cook, not 8 to 10.

On my second attempt, I had excellent luck using a jumbo size muffin pan (I think they call them Texas size?) and I gave it a light mist of vegetable spray, then put in the scant tablespoon of water and a large egg. I baked them at 350° for exactly 12 minutes (not 8 to 10)
and they lifted right out of the pan with a spoon.....YUM!!!


  A PERFECTLY POACHED EGG !!
 
Whether you are making one or 30, this method (with my tweaks) really does work and it couldn't be easier!!
 
The difference in cooking time (between my oven and the Foodstyle video) COULD be that their oven simply runs hotter than mine or maybe they were using smaller eggs (?)With so many variables, I suggest you do a "test egg" to see how long it takes in your oven before you make a whole pan of these.
 
One other note: When your eggs are done to your liking, take them OUT OF THE PAN right away or they will continue to cook.
 
Don't you just want to
dunk your toast in this one?
 
ENJOY !!!


MAPLE CANDIED BACON !!

Now I know that bacon isn't on a lot of our low calorie diets, but once in a while, you just have to live a little!!

I've seen candied bacon recipes all over the Internet and often wondered what all the fuss was about, after all, what can be better than fried bacon? Well, I'm here to tell you that CANDIED BACON is the answer. Holy cow, this stuff is good!!


Some people are dicing it and putting it on top of maple frosted cupcakes, some people are dicing it and putting it into deviled eggs, and some people like me who shall remain nameless, just devour it right out of the warm pan!!  It's just THAT good!!

 
There's not much of a recipe, but there ARE several tips I can give you that will help a bit.
 
First of all, use a large cookie sheet that has a lip on it. Line it with foil (this will make clean up a breeze) and put an oven safe wire rack on the foil (make sure to spray both sides of the baking rack with cooking spray too...that will also help).
 
 
Now a word about which bacon to use. Quality thick sliced smoked bacon works best, but it takes a lot longer to cook. Regular thickness smoked bacon works well but you REALLY have to watch it like crazy so it doesn't burn.......it's your choice.  I think I like the thicker bacon better; I have had great success using apple wood smoked bacon.
 
Preheat your oven to 400° if you are using thick bacon and 375° if you are using regular thickness.
 
Mix 1/2 cup of REAL maple syrup and 1 teaspoon Dijon mustard. Place the raw bacon slices on the baking rack, making sure that the slices don't overlap. Baste the raw bacon liberally (on one side) with the syrup-mustard mixture. 
 
Bake thick bacon for 20 minutes and regular sliced bacon for 15 minutes. Remove from oven, flip the bacon over and baste the other side with the syrup-mustard mixture. Put back in oven and bake the thick slices for another 20 minutes and the regular slices for another 10 minutes.
 
CAUTION: If you use the regular sliced bacon, watch it very carefully the last few minutes, because it can burn quickly if you leave it in too long.
 
 
When you take it out of the oven (the last time), sprinkle it very lightly with black pepper and TAKE IT OFF OF THE BAKING RACK.
 
I cool mine on parchment paper for about 15 minutes; unless I'm eating it right away I turn it over to make sure it cools/dries evenly.
 
NOTE: When I am out of REAL maple syrup, I've tried this recipe using pancake syrup. It works ok too, but it burns easier and the real maple syrup tastes a LOT better.
 
ENJOY !!

FRUIT FILLED COOKIE BARS

I had a hard time coming up with a name for this delicious treat. It is not exactly a cake, but it's a little soft to be a cookie. It does remind me a little of one of those big soft cake-y sugar cookies, but don't forget it has a juicy fruit filling too, so what category does it really fall into?  Answer: Yummy Category!!


Usually, we just eat these out of hand, but they are also nice enough for company if you serve them with a scoop of ice cream!! Either way they are hard to beat with a tall glass of milk or a hot cup of tea.

1/2 cup butter (room temperature)
1 cup sugar
2 eggs
1 1/2 cups flour
1 teaspoon vanilla
14 ounce can fruit pie filling (see note)

Cream butter, sugar and vanilla together until very well mixed. Add the eggs, one at a time, beating well in between each egg.

Add flour and beat until well mixed, then let the dough sit for about 5 minutes.

Press 3/4 of the dough into a lightly greased 9" x 9" pan (I use a (9" springform pan).  Make the outside edge just a little deeper than the rest of the crust (this will help keep the fruit away from the edge of the pan).

Top with fruit filling (see note) and then drop little bits of the rest of the reserved dough on top of the fruit filling.

Bake in a pre-heated 375 oven for 35-40 minutes depending on how hot your oven runs. My electric oven takes 37 minutes.

Let cool for a while then drizzle with a vanilla frosting glaze.

Cool and store covered.


NOTES:

Any home made or commercial fruit filling will work well in the recipe, but I suggest that if you use a commercial pie filling, that you jazz it up a little. Example: if you are using cherry pie filling, add 1/4 teaspoon of almond extract, if you are using apple pie filling, chop them up a little and add a little more cinnamon and nutmeg or maybe a few raisin? Use your imagination.

You can double the ingredients and bake it in a 9" x 13" pan for 40-45 minutes.  Either way, use the toothpick test to make sure its done in the middle.


BACON EGG and CHEESE TOAST CUPS

This is a very EASY recipe because most of it can be made ahead of time.  It is a FUN breakfast to serve company or a bunch of rowdy teenagers or a breakfast buffet crowd because it can be finished off last minute!!


There are no real measurements for this recipe; just one circle of toast, a pinch of cheese, one egg and one slice of precooked bacon for each serving (use the regular thickness bacon  because thick bacon won't work for this recipe).

These little beauties are quite filling and two of them make a hearty breakfast.

The "do ahead part" is to spray the cupcake pan generously with vegetable spray, then put a "toast circle" (un-buttered) in the bottom of each cupcake well.

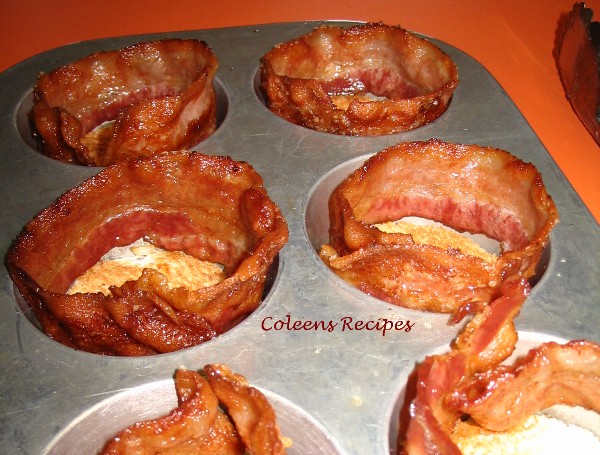
Next, pre-fry the bacon. I do mine in the oven (the day ahead) because it comes out perfectly flat and easy to work with.  Click HERE for my post on cooking bacon in the oven.

Bake the bacon at 375 (no need to preheat) for about 20 minutes, or if you are frying it, cook it about 2/3 done (you want it almost done, but still pliable).  Drain the bacon but don't let it cool down much (it tends to get stiff as it cools down). Quickly wrap each cupcake well, like this:

Add a healthy pinch of shredded cheddar ( I also like pepper jack cheese) on top of the toast, like this:

At this point, you can put them in the fridge and bring them out the next morning.

When it's time to eat, preheat your oven to 400 and carefully break an egg into each "nest"

Sprinkle with kosher salt and coarsely ground pepper. Put them into the oven for for 15-18 minutes or until the eggs are done to your liking. Let the finished eggs sit in the pan for a minute or two (don't worry, they stay very hot).

Scoop the baked egg cups out of the pan with a spoon (they come out easily). If you like your eggs done fairly well (like we do), you can pick these up and eat them out of hand, but if you like a soft set egg, you'll need a plate and fork.


I am definitely making these for Christmas morning,
along with fruit cups
and cinnamon rolls!!

EASY SOURDOUGH WAFFLES AND PANCAKES

This is the lightest waffle you will ever eat, I guarantee. I found this recipe in an old Alaska cook book about 40 years ago and I've used it, without a single change, ever since; recipe snobs purest would call this a sourdough cheater recipe; I call it perfection!!

Our kids were raised on these waffles. The recipe involves making a basic starter, then letting it sit, covered at room temperature for at least 24 hours (better at 48 hours). The longer you let it sit (up to 3 days), the stronger the sourdough flavor will be.

Hubby likes tons of butter and maple syrup, but I like my waffles with strawberries.


 Twenty four to forty eight hours before you want to cook the waffles, mix the following in a two quart pitcher (or bigger) that has a lid SEE NOTE BELOW ABOUT CONTAINER SIZE BEFORE YOU START TO MIX.

2 cups of all purpose flour
1 teaspoon white sugar
2 cups of warm water
2 envelopes of dry active yeast

Mix it well and put the lid on the pitcher (leaving a very small vent opening). Let the batter sit at room temperature 24 to 48 hours. This is called a sourdough starter.

When you are ready to cook, stir the above "starter" and add:
1 teaspoon salt
2 tablespoons white sugar
2 eggs (slightly beaten)
1/4 cup vegetable oil
1 teaspoon baking soda

Stir well and let it sit for about five minutes before you cook them.I don't grease or spray my waffle iron, but I'm not sure how yours works.
This photo is a cross section of one of the waffles. You can see all of the bubbles inside of the waffle...that tells you how light and airy they are!!

SOURDOUGH PANCAKES
If you rather have pancakes, the process is the same as for the waffles, but the measurements are a little different. Put together the same starter (ingredients above) that you would for waffles. But after it has set for 24 to 48 hours, add:

2 slightly beaten eggs
1 teaspoon baking soda
1 teaspoon salt
1 tablespoon sugar
2 tablespoons vegetable oil
Mix well and let the batter sit 5 minutes. Fry on very lightly oiled griddle.


Important Note:

This sourdough starter expands (in volume) like crazy about half hour after you first mix it (at least 3 times its original size) so keep that in mind when you choose a container to mix it in. After a couple of hours, the batter will deflate to its original size.

The batter will increase in volume AGAIN when you add the baking soda. eggs, etc. I have always use a 2 quart juice pitcher with lid (to mix the starter in). I haven't had it over-flow yet (it comes close) but it hasn't.

NOTE: The longer you let the starter sit, the more likely you will have a clear liquid separate and sit on top of the starter. This is the "good stuff" that makes the waffles/pancakes taste like sourdough; do NOT remove it, just mix it back into the starter.

NOTE: As for how many people this recipe will serve; it depends on how many pancakes/waffles your kids can eat. I used to feed 2 adults and 3 young kids with this recipe. If you are feeding teenagers, I'd double the recipe.


HASHBROWN CRUST QUICHE

The beauty of this recipe, besides its "yummy-ness",is that it is ultimately consumer friendly. You can add (or subtract) your favorite veggies or meat to your liking...don't like mushrooms? Don't add them. REALLY like broccoli? Double the amount used. It all works and turns out great. The hashbrown crust is a nice, easy, and tasty change from the traditional quiche crust.


 3 cups UNcooked shredded hashbrown potatoes
1/3 cup melted butter (I use a little less)
salt and pepper to taste
1 cup diced cooked breakfast meat
1/4 cup thinly sliced green onions (optional)
1 cup shredded cheddar cheese (pepper jack is good too)
4 eggs
½ cup milk
1 cup broccoli pieces
½ cup diced red bell pepper
.
Mix the melted butter with the uncooked shredded hashbrowns and press into a 9" pie plate (I use an 8"x8" pan) sprinkle with salt and pepper. I like to use "Simply Shred" potatoes that you find next to the eggs in the market (not frozen). If you use frozen hashbrowns, thaw completely and dry them between paper towels before using.

Bake in a pre-heated 425F oven for 20 minutes or until the potatoes start to brown. Remove from oven.
.
Top with the meat and veggies. I like to use thin cut Black Forest ham, but cooked breakfast sausage works well and of course you can't go wrong with crisp crumbled bacon!! I also saute the veggies just a little before putting them on top of the hashbrown crust; top with shredded cheddar (or cheese of your choice).
.
Whisk the eggs, milk and ½ teaspoon salt and ¼ teaspoon black pepper together and pour over everything. Don't be tempted to add extra eggs.
.
Reduce heat to 350 and bake for 20 to 25 minutes or until golden on top.

Daily Categories

Powered by Blogger.

Blog Archive