CV, CALENDAR, RESUME, LETTERS TEMPLATES

 
Showing posts with label NO BAKE DESSERTS. Show all posts

EASIEST NO-BAKE CAKE IN THE WORLD

The title, Easiest No-Bake Cake in the World, is not an exaggeration, that's for sure. It is also very impressive to serve, and EVERYONE wants the recipe. It's delicious, unique and SUPER EASY to make.


Before I give you the "recipe", let me just say that there really isn't a recipe. It's just homemade whipped cream, chocolate wafer cookies (chocolate graham crackers work too), and some decorations (nuts, candies, sprinkles, etc.). Then it sits in the fridge overnight. By the next day, the cookies (or graham crackers) will have softened, and they will taste just like cake !!

OK, here goes: The recipe calls for Nabisco chocolate wafer cookies, but some people have a hard time finding them (and they are expensive), that's why I'm suggesting CHOCOLATE graham crackers work equally as well (I think the chocolate graham crackers even taste better than these wafer cookies).

 
The recipe also calls for homemade whipping cream.  You can use Cool Whip if you have to, but it won't be as TASTY as homemade whipped cream:

3 cups heavy whipping cream
5 tablespoons sugar
2 teaspoons vanilla Extract

Beat these ingredients with an electric mixer (on high) until stiff peaks form, but don't over whip because it starts to taste like butter.

HINT: If you live in a hot climate, put your bowl and beaters in the freezer for 5 minutes (to cool them down) before making the whipped cream.

Now, it's time to assemble:  make 4 stacks of cookies (or chocolate graham crackers) 9 cookies high, putting some whipped cream in between each cookie, like this:


Next, lay the stacks on a serving plate next to each other (not end to end). They will want to smoosh around a little, but a very flat thin spatula will help you lift and maneuver each stack. It should look like this:

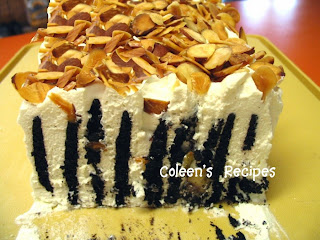
It's important to arrange them like this, so that when you serve this cake, you will be cutting ACROSS the cookies (the reason will be more obvious in the following photos.

Next cover the whole "cake" with a nice thick layer of whipped cream, like this:


Decorate (or don't decorate) the top of it with whatever you like: nuts, crushed candies, sprinkles, etc.
Cover lightly with plastic wrap and
chill overnight before you serve.
 
When it comes time to serve, cut the cake with a sharp, thin bladed, knife. It will slice through the softened cookies easily.
 
 
See why it's important to arrange the cookies cross wise, so when you cut it, you get this impressive design?
 
Store, covered, in the fridge and be prepared for recipe requests.
 
 
ENJOY !!!


PEANUT BUTTER ECLAIR CAKE

The Éclair Cake idea has been around for years. It is a magical dessert that starts with pudding mix and graham crackers, and when it sits in the fridge overnight, something magical happens. The graham cracker layer "softens" and sort of turns into a "cake" layer (people are shocked when they find out its just graham crackers). The whole thing is delicious and I've made it a billion times.  But todays post is a new and simple twist to the Éclair Cake: peanut butter!!

Yes, peanut butter is mixed into the pudding and it takes this simple dessert in a whole different direction. The next time I make this variation, I will use chocolate graham crackers (I only had regular ones this time)....you've gotta give this one a try.  


(2) 3½ ounce instant vanilla pudding
1 cup creamy style peanut butter
8 ounce Cool Whip thawed
3 cups of milk

1 pound of graham crackers

CHOCOLATE FROSTING

6 tablespoons butter (melted)
6 tablespoons boiling water
6 tablespoons baking cocoa
2 cups powdered sugar
1 teaspoon vanilla

Place a single layer of graham crackers in the bottom of a 9x13 dish (breaking to fit if necessary). With an electric mixer, beat the instant pudding, peanut butter with 3 cups milk until very smooth (about 2 minutes) then fold in the Cool Whip. Immediately pour half of this mixture over the 1st layer of graham crackers, spreading it out evenly.

Put another layer of graham crackers on top of the pudding and then another layer of pudding mixture. Top second layer of pudding with a final layer of graham crackers.

Cover the dish tightly, with plastic wrap, and refrigerate for about an hour before you frost it.

After an hour of chilling, whisk together the melted butter, boiling water, cocoa and vanilla until well blended. Add powdered sugar and whisk until smooth. Immediately pour the frosting over the chilled pudding dessert and gently smooth it out.

Place dessert (uncovered) in fridge for an hour or so (until the frosting feels dry to the touch),then stretch plastic wrap over the pan(stretching it tightly so that it doesn't sag and touch the frosting)or just snap a lid onto the dish.
 Refrigerate overnight (important).


NOTE: After this "cake" has been in the fridge, overnight, it is easy to cut into squares to serve because the graham crackers are soft.

PEANUT BUTTER KRISPIE TREATS

This "recipe" couldn't be easier, faster or tastier. In this batch, I added 3/4 cup of miniature chocolate chips to the final mix stage, but the straight peanut butter squares are to-die-for delicious!! They are excellent for snacking, for bake sales, for lunch boxes and especially for "whenever"!!

1 cup sugar
1 cup corn syrup
1 cup peanut butter

Mix the above ingredients in a sauce pan that has a nice heavy bottom. Heat (on medium) until you JUST START to see bubbles around the edge of the pan (watch and stir,  because this mixture wants to scorch if you heat it too fast).

As soon as you see the little bubbles around the edges of the pan, remove from heat and stir in 1 teaspoon of vanilla; mix well.

Pour over 6 cups of Rice Krispie cereal and mix well. If you are going to add the miniature chocolate chips; add them after the peanut butter mixture has coated the cereal; the heat of the mixture will melt them just a little, so don't add the chocolate too early.

Pour into a lightly buttered 11" x 7" dish. Pat down with slightly dampened hands. Allow to cool completely and cut into squares.

NOTE: I don't butter my dish, I spray it with vegetable spray and then use a paper towel to wipe out the excess, that way the squares don't have a "greasy" side and the squares DO NOT STICK to the pan.

NOTE: If you have any treats left, after your family descends upon these, store them in an airtight container, or cover tightly with plastic wrap.

STRAWBERRY CHANTILLY

This is a fantastic frozen dessert for those hot summer get-togethers. It is quick, easy, pretty and can be made days ahead.

The strawberry mousse filling sits on a shortbread cookie crust and the whole thing is frozen and ready for company at a moments notice. 


COOKIE CRUST
1 cup all purpose flour
1/4 cup brown sugar
1/2 cup cold butter
1/2 cup chopped pecans (optional)

Cut the cold butter into the flour and sugar (I used my food processor)then stir in the nuts if you are going to use them and press the mixture into a 9" or 10" spring form pan.  Bake at 325° for about 20 minutes. Cool completely.

STRAWBERRY FILLING
2 egg whites        (see note below)
1 cup granulated sugar
2 cups fresh strawberries
1 teaspoon lemon juice
1 cup heavy whipping cream
1/2 teaspoon vanilla extract

Chop the fresh strawberries in a food processor until they are a smooth puree.

Put the pureed berries, egg whites, sugar, and lemon juice in a stand mixer and whip it on high for a full ten minutes.

In a different bowl, beat the whipping cream and vanilla until you get stiff peaks, then gently fold it into the strawberry mixture, until well mixed. 

Pour it over the crust and freeze it overnight (or at least 8 hours).

To serve, remove from freezer about 15 minutes before slicing.

If you don't have a spring form pan, you can make this in a 9" x 13" dish.

NOTE: When I don't want to heat up the kitchen by baking the cookie crust, I substitute a graham cracker crust for the shortbread crust and sprinkle a few extra crumbs on top.


NOTE: If your strawberries are really big, cut them in half before you measure out 2 cups.

NOTE: If using raw egg whites freaks you out, I'm assuming you could use powdered egg whites which are pasteurized and safe to eat. I've never tried the powdered egg whites in THIS recipe, but I don't see why they wouldn't work.


Microwave Chocolate-Marshmallow Pudding

Super quick, super easy, rich and chocolate-y, and very inexpensive to make; this fun dessert will satisfy your chocolate craving for sure!! Equally delicious warm or cold, you can have this treat on the dinner table in no time.


1/2 cup brown sugar
1/3 cup unsweetened baking cocoa
pinch salt
3 level tablespoons corn starch
2 cups milk (see note below)
1 tablespoon butter
1 teaspoon vanilla
2 cups mini-marshmallows (optional)

In a large glass bowl, mix the brown sugar, cocoa, salt and corn starch. Slowly add the milk and mix well. At first the cocoa will sort of sit on top of the milk, but if you mix well with a whisk, it will mix together in a minute or so.

Microwave on HIGH for 3 minutes. Carefully remove from microwave, and stir well (again with whisk).  Put it back in the microwave (one minute at a time...stirring well after each minute) until the pudding is shiny and thick.  My microwave took the initial 3 minutes, then 2 more (1 minute) intervals), but everyones microwave is different, so just mix it well after each interval and when it is shiny and thick, it's done.

After pudding is thick, stir in butter and vanilla and mini-marshmallows. The heat from the pudding will melt the marshmallows, so don't stir them too much (you want them to stay whole if possible).  Chill the pudding in dessert dishes.


NOTE: I like to use whole milk in this recipe, but I make it with 2% milk a lot too.

NOTE: Marshmallows totally optional.

NOTE: Don't microwave this pudding in a plastic bowl because the plastic gets hotter than the pudding for some reason; glass is the best.

Daily Categories

Powered by Blogger.

Blog Archive