CV, CALENDAR, RESUME, LETTERS TEMPLATES

 
Showing posts with label EGGS. Show all posts

DYE EASTER EGGS WITH KOOL-AID !!!

I found this fantastic idea on Pinterest and it works extremely well. Not only does it produce a pretty colored Easter egg, but  it doesn't smell up the whole kitchen like a vinegar based dye does, PLUS it is very economical!!


This could not be simpler: 

Mix one small packet of UNSWEETENED Kool-Aid powder into 2/3 cup warm water and mix.

A coffee mug works well for this; a different color Kool-Aid in each mug. Place a hard boiled egg in the liquid for about a minute then set the colored egg on paper towels.  That's it!! I TOLD you it was easy!!

The lemonade (yellow)isn't very bright, but if you add a little orange to it, it will give you a great color. Pink lemonade is a beautiful color; try them all and have fun!!


Happy Easter !!

Note: Use the small packets of Kool-Aid. Most of them are about .15 ounce, (it isn't critical).


OVEN POACHED EGGS !!

A dear friend of mine, posted a video (from Foodstyle.com)about
poaching eggs in the oven and I was quite intrigued. Not only can poaching eggs, in the traditional method, be a disaster be challenging but you can only make 2-3 at a time!!

Here is what I found:

The video said to put about a tablespoon of water in each cup of a regular muffin pan, then crack an egg over the water and bake at 350° for 8 to 10 minutes.........well, that ALMOST worked.

I DID use the scant tablespoon of water, and I DID preheat my electric oven to 350°, but when I tried it using a standard cupcake (muffin) pan, the egg + water filled it to overflowing and took a full 20 minutes to cook, not 8 to 10.

On my second attempt, I had excellent luck using a jumbo size muffin pan (I think they call them Texas size?) and I gave it a light mist of vegetable spray, then put in the scant tablespoon of water and a large egg. I baked them at 350° for exactly 12 minutes (not 8 to 10)
and they lifted right out of the pan with a spoon.....YUM!!!


  A PERFECTLY POACHED EGG !!
 
Whether you are making one or 30, this method (with my tweaks) really does work and it couldn't be easier!!
 
The difference in cooking time (between my oven and the Foodstyle video) COULD be that their oven simply runs hotter than mine or maybe they were using smaller eggs (?)With so many variables, I suggest you do a "test egg" to see how long it takes in your oven before you make a whole pan of these.
 
One other note: When your eggs are done to your liking, take them OUT OF THE PAN right away or they will continue to cook.
 
Don't you just want to
dunk your toast in this one?
 
ENJOY !!!


BACON EGG and CHEESE TOAST CUPS

This is a very EASY recipe because most of it can be made ahead of time.  It is a FUN breakfast to serve company or a bunch of rowdy teenagers or a breakfast buffet crowd because it can be finished off last minute!!


There are no real measurements for this recipe; just one circle of toast, a pinch of cheese, one egg and one slice of precooked bacon for each serving (use the regular thickness bacon  because thick bacon won't work for this recipe).

These little beauties are quite filling and two of them make a hearty breakfast.

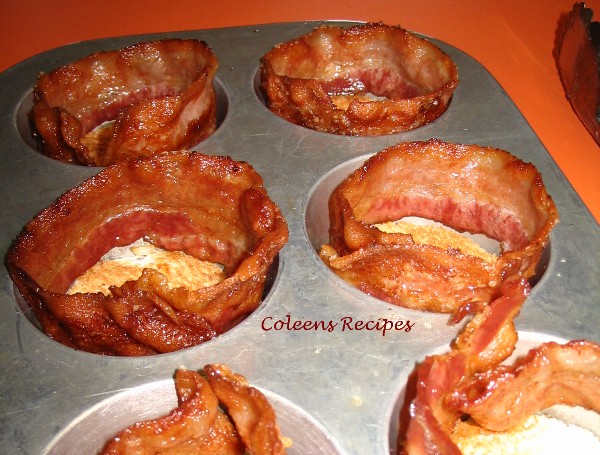
The "do ahead part" is to spray the cupcake pan generously with vegetable spray, then put a "toast circle" (un-buttered) in the bottom of each cupcake well.

Next, pre-fry the bacon. I do mine in the oven (the day ahead) because it comes out perfectly flat and easy to work with.  Click HERE for my post on cooking bacon in the oven.

Bake the bacon at 375 (no need to preheat) for about 20 minutes, or if you are frying it, cook it about 2/3 done (you want it almost done, but still pliable).  Drain the bacon but don't let it cool down much (it tends to get stiff as it cools down). Quickly wrap each cupcake well, like this:

Add a healthy pinch of shredded cheddar ( I also like pepper jack cheese) on top of the toast, like this:

At this point, you can put them in the fridge and bring them out the next morning.

When it's time to eat, preheat your oven to 400 and carefully break an egg into each "nest"

Sprinkle with kosher salt and coarsely ground pepper. Put them into the oven for for 15-18 minutes or until the eggs are done to your liking. Let the finished eggs sit in the pan for a minute or two (don't worry, they stay very hot).

Scoop the baked egg cups out of the pan with a spoon (they come out easily). If you like your eggs done fairly well (like we do), you can pick these up and eat them out of hand, but if you like a soft set egg, you'll need a plate and fork.


I am definitely making these for Christmas morning,
along with fruit cups
and cinnamon rolls!!

AVOCADO EGG SALAD

This quick and HEALTHY change to mayo-laden egg salad was a huge success; we didn't miss the mayo at all!! It was light and delicious and packed with flavor. I can see countless possibilities with this little recipe (I'm already planning to add a few green onions? hot sauce?).

Personally, I enjoyed this salad just wrapped in a big leaf of lettuce, but Picky-Picky husband went for the traditional sandwich.
4 hard boiled eggs, peeled and chopped
1 large ripe avocado
2 stalks celery chopped finely
1/3 cup diced tomato flesh (see note)
2 tablespoons prepared yellow mustard (see note)
salt to taste (I just added a pinch)
pepper to taste (see note)

NOTE: NO MAYONNAISE!!

Cut the avocado in half, remove the pit and mash the flesh (I mashed about 3/4 of the flesh into a smooth paste and left 1/4 of the flesh in little chunks.

Stir the prepared yellow mustard, salt and pepper into the mashed avocado,  mix well.

Add the chopped eggs, celery and tomato and stir gently until well mixed.  That's it!!


NOTE: I wasn't sure how to explain "tomato flesh"; it just means leave out the juicy-seedy part of the tomato.

NOTE: Two tablespoons of yellow mustard is going to seem like a lot, but the final product does NOT taste overly mustardy, trust me. I just used plain old yellow hot dog mustard.

NOTE: I cook with coarsely ground black pepper, so I used a scant
half teaspoon. If you use finely ground pepper (it measures differently) use less.

NOTE: I put this salad in the fridge for several hours without any avocado darkening problems because I laid plastic wrap right on the surface of the salad and pressed down a little to force out all of the air. I'm not sure if it would turn dark overnight because it never lasts that long at our house.

Daily Categories

Powered by Blogger.

Blog Archive