CV, CALENDAR, RESUME, LETTERS TEMPLATES

 
Showing posts with label POT LUCK RECIPES. Show all posts

EASY RASPBERRY UPSIDE-DOWN CAKE

This quick and easy recipe comes from bettycrocker.com.  It is an excellent recipe to have in your "Company is coming last minute" recipe file. Served warm with ice cream, it is always a hit for breakfast OR dinner.


The original recipe called for 1 1/2 cups of fresh raspberries. Well, I don't know about you, but I seldom have fresh raspberries laying around my house, but I DO have frozen raspberries, so when I make this, I use a whole 12 ounce bag of frozen red raspberries in this recipe.

1/4 cup butter
1/4 cup sugar  (I use 1/3 cup)
1 1/2 cups fresh raspberries (I use 12 ounce frozen raspberries)
2 tablespoons sliced almonds (I leave out)
1 1/2 cups original Bisquick mix
1/2  cup sugar
1/2 cup milk
2 tablespoons vegetable oil
1/2 teaspoon vanilla  (I use 1 teaspoon)
1/2 teaspoon almond extract
1 egg

Preheat oven to 350°. Line the bottom of a 9" round cake pan with parchment paper and then spray the pan and parchment with cooking spray.

Mix 1/4 cup sugar (I use 1/3 cup sugar here) with 1/4 cup melted butter and pour over the parchment paper.

Next arrange the raspberries evenly over the butter-sugar mixture. Sprinkle with almonds if you are using them.

In medium mixing bowl, beat the Bisquick mix + 1/2 cup sugar + 1/2 cup milk + vegetable oil + extracts + egg, with an electric mixer on low for 30 seconds, scraping sides of bowl.

Beat on medium speed for 4 minutes, scraping sides of bowl. Pour over berries.

Bake 35-40 minutes or until a toothpick in center tests clean. Immediately place heatproof serving plate, upside down over baked cake; turn plate and pan over.

Important: leave pan over cake for several minutes so that the sweetened berry layer can drizzle over cake.

Remove pan and cool at least ten minutes before serving.  Serve with whipped cream or ice cream.  Store cake loosely covered.

NOTE: If you are using frozen raspberries, do NOT thaw them out, just put them in the microwave for about 15 seconds or so, so that they will be loose and workable, then proceed as if you were using fresh raspberries.

NOTE: I drizzle a light vanilla frosting glaze over the berries, but that is completely optional.  I don't have a recipe for the glaze, I just mix a little melted butter, a little powdered sugar, a little vanilla and a little milk, then whisk it together and drizzle over top.


ENJOY !!!

PEANUT BUTTER BROWNIES

This is, by far, the best peanut butter brownie recipe I've tried. It is quick and easy and has a FIVE STAR peanut butter-honey frosting. We can't seem to stop snacking on it!!


PEANUT BUTTER BROWNIES
1/2 cup creamy peanut butter (I use Jiff)
1/3 cup butter at room temperature
2/3 cup granulated sugar
1/2 cup brown sugar
2 eggs
1 teaspoon vanilla extract
1 cup flour
1 teaspoon baking powder
1/2 teaspoon salt
1/3 cup mini-chocolate chips (semi-sweet)

Preheat oven to 350°F. Grease a 9 x 9 baking pan (personally, I do not grease, I use parchment paper instead.

By hand or mixer, cream the peanut butter and butter till smooth. Add brown sugar and white sugar, eggs and vanilla. Beat until smooth.

In a small bowl, mix flour, baking powder, salt and chocolate chips.
After it's all mixed together, add it to the peanut butter mixture and mix just until well combined, don't over mix.

Spread evenly in parchment lined pan and bake for 25 minutes or until top springs back when you touch it. Don't over bake!! You might be tempted to give it an extra 5 minutes for good measure, but don't!!

Cool completely before frosting.


PEANUT BUTTER - HONEY FROSTING
3 cups powdered sugar
3 tablespoons butter
4 tablespoons creamy peanut butter
2 tablespoons honey
3 tablespoons milk
1 teaspoon vanilla extract

Put the butter and peanut butter in the microwave for about 10 seconds to soften them.  Whisk everything together until smooth.

If the frosting seems a little thicker than you want, add an extra tablespoon of milk. If it seems thinner than you want, add an extra tablespoon (or two) of powdered sugar.

ENJOY !!!
 
Make sure you toss the mini-chocolate chips with the flour, so they don't sink in the batter.

POTLUCK PEANUT BUTTER PIE

If you are looking for a GREAT recipe for a holiday potluck, this is it. It is very quick and easy to make and disappears from the buffet table first, followed by lots of requests for the recipe.

You can double or even triple this recipe for a big crowd. These photos were taken recently when I made just 1/4 of the recipe since we are empty nesters. You'll just have to use your imagination for the 9 x 13 size.


CRUST
2 1/2 cups chocolate graham cracker crumbs
1/2 cup sugar
1/2 cup melted butter

Combine all crust ingredients and press into a 9 x 13 pan (pushing up the sides a little) and bake in preheated 375° oven for 10 minutes. Cool on wire rack before you add the filling.

FILLING
(2) 8 ounce packages of cream cheese, softened
2 cups creamy peanut butter  (see note)
2 cups sugar
2 tablespoons soft butter
2 teaspoons vanilla
2 cups whipping cream

In your stand mixer, beat the cream cheese until it is smooth, then add the peanut butter, sugar, butter and vanilla.  Beat until the mixture is very well mixed and smooth.

In a separate bowl, whip the cream until you get stiff peaks, then gently fold it into the peanut butter mixture by hand, making sure that it is well mixed and you don't see any streaks of white.

Pour filling over the baked crumb crust. Frost with additional whipped cream and chill the whole thing for 3-4 hours.

NOTE: OK......here's a warning.... if you are like me and you like to lick the beaters and spoons, you will notice sugar grains in the filling.....don't freak out. After it chills in the fridge for a couple of hours, they will totally disappear and the filling will be SILKY SMOOTH!! I promise.


ANOTHER NOTE: You would think that a recipe with TWO CUPS of peanut butter would be very heavy, but this dessert is light as air!!

NOTE: HALF of this recipe will fill a 9" pie plate perfectly.


This stuff is totally addicting!!

ENJOY !!!

PINEAPPLE--PUMPKIN--CARROT BARS

I have tried a LOT of snack cake recipes in the past 40+ years, but this one is, BY FAR, the best yet. It is super moist and tender from the crushed pineapple, pumpkin and grated carrots and it would be PERFECT for any potluck or party; your guests of all ages will love it. It is one of those RARE recipes that is super easy AND it gets RAVE reviews.


No need for an electric mixer, this quick and easy treat goes together in a flash with a big bowl and a spoon.

2 cups all purpose flour
1 teaspoon salt
1 teaspoon baking powder
1 teaspoon baking soda
1 teaspoon cinnamon
1 teaspoon pumpkin pie spice
4 eggs
1 2/3  cups white sugar
2/3  cup vegetable oil
1  (15 ounce) can pumpkin puree
2 cups shredded carrots  (see note below)
1  cup crushed pineapple (see note below)

Preheat oven to 350°F and grease and flour a 10x15 baking pan (see note below).

Mix the flour, salt, baking powder, baking soda, cinnamon and pumpkin pie spice in a bowl and set it aside.

In a large bowl, whisk the eggs till smooth, then add the sugar, oil and pumpkin, whisking it until its very well mixed, then stir in the drained crushed pineapple and grated carrots. Stir till well combined.

Stir in the flour mixture and gently fold until its all well mixed.
Pour into prepared 10 x 15 pan and bake at 350°F for 25-30 minutes (my electric oven took 30 minutes).

Remove from heat and cool before you frost.

CREAM CHEESE FROSTING
(1) 8 ounce pkg. cream cheese (room temperature)
6 tablespoons butter (room temperature)
1 teaspoon vanilla extract
2 1/2  cups powdered sugar

Beat the cream cheese and butter till smooth, add extract and powdered sugar and beat until right consistency.

NOTES:
This cake will turn out better if you hand grate the carrots with a box grater rather than grating them with your food processor. The food processor leaves very long strings of carrot, which doesn't do so well in a cake/bar.The box grater will give you a smaller/shorter grate.

Make sure the crushed pineapple is squeezed dry of all of it's extra water. I found that a 20 ounce can of crushed pineapple.....squeezed dry with my hands, gives me 1 cup of ready to use crushed pineapple which is just right for this recipe.

Not everyone has the 10 x 15 baking pan that is called for in this recipe. You can bake this cake in a 9 x 13 pan if you bake it a little longer (about 10-15 minutes longer... just test it with a toothpick to make sure its baked all the way through). The 9 x 13 pan will give you a thicker bar (almost like a cake) but it tastes the same. If you decide to use the 9x13 pan, the bars will be more like a cake


Personally, I like to line my baking pans with parchment paper and then spray the parchment paper with cooking spray. When the cake/bars are completely cool, you can just lift the whole thing out of the pan and it makes it much easier to cut up neatly.

ENJOY !!!

CHOCOLATE WHOOPIE PIES

This recipe makes a Whoopie Pie that is light as air and very tender. I like to wrap them individually (after they are completely cool) which makes them perfect for lunch boxes. They are also very popular at potlucks and bake sales.

 
Preheat oven to 450° and spray cookie sheets with cooking spray

WHOOPIE PIE COOKIES

2 cups sugar
1/2 cup shortening (no substitutions)
2 eggs
1 cup sour milk (*see note below)
1 cup BOILING water
1/2 teaspoon salt
1 cup unsweetened bakers cocoa
1 teaspoon vanilla extract
4 cups all purpose flour
1/2 teaspoon baking powder
2 teaspoons baking soda

*NOTE: To get sour milk,  put 1 teaspoon of lemon juice in a cup and then fill it up with milk; let it stand for 5 minutes.

DIRECTIONS
Beat the eggs, shortening (I use butter flavored Crisco) and sugar in a large bowl until very smooth, scraping sides.

In a separate bowl, mix sour milk, boiling water, salt, cocoa and vanilla. Stir till smooth.

In another bowl, mix the flour, baking powder and baking soda.

PUT IT ALL TOGETHER

Mix the cocoa-liquid mixture into the creamed butter and sugar mixture. Mix well.  Gradually add the flour mixture and beat until smooth.   Let batter sit for 5 minutes.

BAKE

Drop batter (about 2 tablespoons per cookie) onto greased cookie sheet and bake at 450° for 5 to 7 minutes. NOTE: My electric oven takes 5 minutes (don't over bake because at this high temperature, the cookies will burn quickly).

Cool cookies on a wrack.  When they are completely cool, put two cookies together with filling.


FILLING

1 cup  UNSALTED butter at room temperature
2 cups powdered sugar
2 teaspoons vanilla extract
(1) 7 ounce container of marshmallow fluff

Cream the room temperature butter until fluffy (takes about 3 minutes on high speed).

Add the powdered sugar, one cup at a time, beating well in between each addition.

Add the marshmallow fluff and vanilla and whip on high until well mixed.

ASSEMBLY
Add a nice thick layer of filling in between two cookies. If they aren't going to be eaten immediately, wrap them in plastic wrap. Recipe makes 24 pies.


ENJOY !!!

MAC and CHEESE BITES

This is such a fun (and easy) recipe. It is great for kids parties or teen parties and you can even jazz them up for adult appetizers. They stay warm for quite a while, but are even tasty at room temperature (nice and creamy).

Mildly seasoned for picky toddlers (perfect size), or add a little zip by using half cheddar and half pepper jack cheese and/or bacon bits.

1/2 pound elbow macaroni
2 tablespoons butter
2 tablespoons flour
1  1/2 cups milk
2 cups shredded sharp cheddar cheese (divided)
2 ounces cream cheese
1/2 teaspoon salt
1/4 teaspoon pepper
small pinch of cayenne
1 beaten egg

Boil the elbow macaroni in SALTED water for 8 minutes, then drain and set aside. Preheat oven to 400° and spray MINI muffin pan with cooking spray.

Note: Salting the water is important. If you don't you will have to increase the amount of salt in the sauce.


In medium size pan, melt butter and stir in flour until smooth and bubbly, let it simmer for about 30 seconds or so.

Slowly add the milk (whisk while you add it) and bring it to a simmer (it will thicken just a little).

Stir in 1 1/2 cups of the cheese (set aside the other 1/2 cup) and add the cream cheese, salt, pepper and cayenne. Stir to melt.

Mix the cooked macaroni, the cheese sauce and the beaten egg. Spoon mac and cheese into greased mini muffin cups and top with just a few shreds of the remaining cheddar cheese.

Bake at 400° for 15 minutes.  IMPORTANT: Let cool for 5 minutes before you take them out of the pan.

NOTES: I cook mine for 14 minutes, then put them under the broiler for the last minute (but watch them so they don't over brown).

NOTES: If you like a little spice, use half shredded sharp cheddar cheese and 1/2 pepper jack cheese.

NOTES: You can even sneak in some finely chopped broccoli for color.

 
This recipe makes about 4 dozen mini bites
 
 
ENJOY !!!
 
Original recipe found at www.chef-in-training.com   (and adapted by Coleen's Recipes)

BEST BAKED CHICKEN THIGHS EVER !!

I kid you not, these chicken thighs are the BEST of the BEST and quick and easy to make. They are SUPER moist, SUPER tender and SUPER flavorful. We couldn't stop eating them and they are going straight to the TOP of my FIVE STAR recipe list.

 
8 boneless skinless chicken thighs  (thawed)
Milk to cover
1/4 cup melted butter

1 tablespoon Coleen's seasoned salt (click here for recipe)
3/4 teaspoon coarse ground black pepper
1/2 teaspoon salt
1 cup flour
2 teaspoons paprika

Put the chicken in a large bowl and cover with milk (I use 2%). Let this sit in fridge for 30 minutes.

Meanwhile, mix the flour, seasoned salt, salt and pepper, and paprika until well mixed. NOTE: I've only ever tried this with my own seasoned salt mixture (click here for recipe)I can't tell you if any other seasoned salt mixtures would taste as good.

Drain the milk off of the chicken and put the chicken in the flour mixture and toss to coat evenly.

Preheat your oven and an EMPTY 9 x 13 baking dish to 400°. When the oven hits 400°, put the melted butter in the hot baking dish, spreading it around so the entire bottom of the pan is covered.

Set the floured chicken on the melted butter and put back in the oven. Bake for 20 minutes. Turn chicken over and bake another 20 minutes. That's it!!

Chicken comes out SUPER tender, SUPER moist and SUPER flavorful.


ENJOY !!!


SWEET BACON-CHICKEN BUNDLES

We discovered these delicious little bundles over the holidays. They are quick to fix and are absolutely perfect for potlucks, buffets, or a quick supper. They are totally addicting, so make lots of them!!


SWEET BACON-CHICKEN BUNDLES
1 pound boneless, skinless chicken breast (we like thighs better)
2/3 cup dark brown sugar
2 teaspoons chili powder

1/2 teaspoon ground cumin
1/4 teaspoon salt
bacon (regular, not thick)


 Preheat oven to 375° and bake the bacon for 10 minutes only. After 10 minutes, drain the bacon and set aside. You will need one half slice of bacon for each chicken bundle.

 
Cut the raw chicken into 1" cubes, then wrap half of (a partially cooked) slice of bacon around each cube of raw chicken, and secure it with a toothpick. Next, mix the brown sugar, chili powder, cumin and salt together and roll the bacon-chicken in this mixture. Make sure you get it into all the folds of the bacon.

Place the bundles on a baking screen or cooling rack that you've liberally sprayed with vegetable spray. Set the sprayed rack on a rimmed baking sheet that you have lined with foil (important for easier clean up). If you have any sugar left over, spoon a teaspoon or so on top of each bundle.

Bake for 30-35 minutes. Delicious hot or room temperature. If you like a little heat along with your sweet, add some cayenne to the sugar mixture.

 
ENJOY !!!
 

SOFT COCONUT DROP COOKIES

These cookies are WONDERFULLY SOFT, rich, flavorful and easy to make. The recipe makes about 3 dozen big 4" cookies and if you store them in an airtight container, they will stay soft and chewy (they are totally addicting!!)

 
Soft Coconut Drop Cookies are PERFECT lunch box cookies, bake sale cookies, potluck cookies or "anytime cookies". They are delicious.

1 cup butter flavored shortening
1 cup sugar
1 cup brown sugar
2 eggs
1 teaspoon vanilla extract
2 cups flour
2 cups old fashioned oats
1 teaspoon baking powder
1 teaspoon baking soda
1/2 teaspoon salt
2 cups sweetened flaked coconut (lightly packed)
1 cup finely chopped pecans (optional)

Cream the shortening, sugars and vanilla until light and fluffy. Add eggs one at a time, beating in between each egg.

Add the flour, oats, baking powder, baking soda, coconut and nuts (if you are using nuts) and beat until well mixed (batter will be thick).

Take a well rounded tablespoon of cookie dough batter and roll it into a ball. Place on a greased cookie sheet spaced 3" apart (I use parchment paper instead of greasing the pan). Bake at 350° for 11-14 minutes (my electric oven takes a full 14 minutes). Leave the cookies on the cookie sheet a minute or two before you remove them.

After they are cooled, store the cookies in an airtight container.

 
ENJOY !!
 
Note: Recipe calls for butter flavored shortening (I use butter flavored Crisco). I'm sure they could be made with butter instead, but they will bake differently and probably spread out a lot more. I also don't think they would stay soft and chewy.


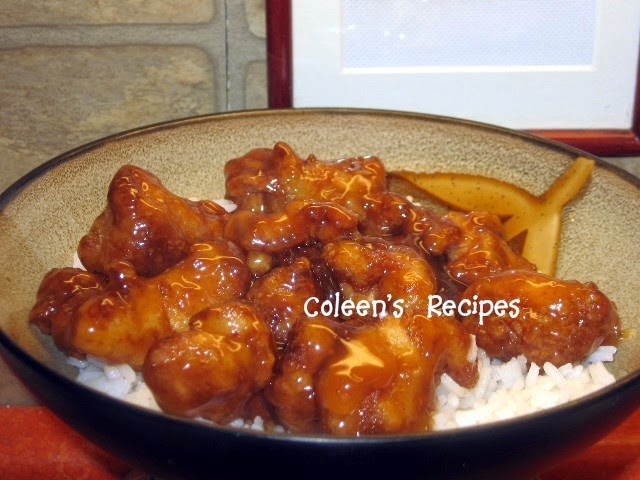
SWEET AND STICKY CHICKEN

This recipe is one of picky-picky husbands all time favorites. There are several steps, but none of them are hard and the end result is oh so tasty!!

Yes, it IS very sweet (after all it is called "Sweet and Sticky Chicken"), but it is a real crowd pleaser and any leftovers are excellent for lunch on day two!!

You can use white or dark meat chicken, but we LOVE it made with boneless and skinless chicken thighs (and we don't usually eat dark chicken), but the thigh meat in this recipe stays very moist and flavorful (and some times, chicken breast meat, cooked like this, can be a little dry.


Cut 4 boneless skinless chicken thighs into 1" cubes. Marinate the cubes in the following mixture:

2 tablespoons cooking sherry (see substitution note below)
1 teaspoon powdered chicken bullion (or one cube crushed)
1/8 teaspoon black pepper
1  1/2  teaspoons sugar
1/2 teaspoon sesame oil

Toss cubed chicken in the above mixture and chill for about an hour.


Now, to bread the chicken:

In bowl #1, put:
1 cup flour

In bowl #2, mix
2 large eggs

In bowl #3, put
1 cup cornstarch


Toss the cubed and marinated chicken in bowl #1. Toss them around until well covered.

Shake off all excess flour mixture and put the meat into bowl #2. Stir them around until well moistened, then but them into the cornstarch in bowl #3, toss to coat well. 

Shake off excess cornstarch and fry in 1" vegetable oil (I use my electric skillet for this step).  Fry until lightly golden and well done. Drain on paper towels.

While the chicken is frying....make the sauce:

1/3 cup honey
1/4 cup sugar
1/4 cup ketchup
2 tablespoons white vinegar
1 tablespoon soy sauce
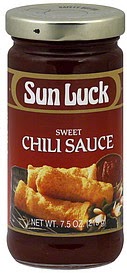
1 tablespoon of sweet chili sauce (see note below)

Put the sauce ingredients into a saucepan and simmer GENTLY for about a minute or two (don't boil hard or it will turn into candy).

Drizzle the sweet sauce over the cooked chicken. Toss to coat well.  Keep hot till serving time.

We like this served over rice.


NOTE:  We are very shy when it comes to spicy foods, so I  use one tablespoon of Sun Luck brand sweet chili sauce in this recipe and the final sauce has next to NO heat, but its a great addition to the flavor.  If you like spicy, then I'd suggest you use something with more heat.
 
 
NOTE:  I never seem to have cooking sherry around, so in this recipe I used 1 teaspoon of vanilla + enough water to make 2 tablespoons. Sounds weird I know, but trust me, it works well in this recipe.


FRUIT JUICE JIGGLERS


“Fruit Juice Jigglers” are a fun treat to serve your children and grandchildren when the weather turns warm because they are cool and refreshing. Better yet, they require NO cups/spoons/napkins; they don’t melt in those hot little hands AND they are nutritious!!

Jigglers are super quick and easy to mix up and after a 3 hour chill in the fridge, they are ready to snack on or take to a potluck (adults love them too!!)


2 cups your favorite fruit juice (divided)
2 envelopes of unflavored gelatin powder

You will find it on  
the regular Jello aisle
 
Measure 1/2 cup COLD fruit juice into a bowl. Sprinkle TWO envelopes of UNFLAVORED gelatin over the juice and stir it a little. Set aside for about a minute or until it becomes fairly solid.
 
Once it becomes solid, pour 1 1/2 cups BOILING fruit juice over it and stir until everything is completely dissolved.  Let it sit for about 5 minutes and stir it again.
 
Pour this mixture into an ungreased 9x9 dish and let it chill for three hours.  Cut into squares and serve.
 
NOTE:  The dish size is not crucial: smaller dishes will give you thicker jigglers, larger dishes will give you thinner jigglers.
 
NOTE: I have only ever done this with clear (no pulp) juices, so I don't know how it would turn out with a heavy pulp juice.
 
NOTE: I use a sharp knife to cut the squares, then I use a 2" (narrow) spatula to help release them from the pan.

NOTE: You can use any flavor fruit juice or fruit juice blend.


ENJOY THE SUMMER FUN !!


THANKSGIVING MINI DESSERT

We just love mini desserts, don't you? No extra plates and forks (we use napkins), no "commitment" to a big slice of something; instead two or three different mini-desserts is more to our liking.

Todays recipe is a combination of two of my favorite holiday treats. It has a bottom layer of moist, spicy pumpkin CAKE and a top layer of rich and creamy CHEESECAKE; what could be better for your holiday buffet table?

 
CAKE LAYER
 
1/2  cup Libby pumpkin puree (NOT the pre-spiced kind)
3/4  cup all purpose flour
1 1/2  teaspoons pumpkin pie spice
1/4 teaspoon salt
1/4 teaspoon baking soda
1 large egg
1/2 cup sugar
1/4 cup + 1 tablespoon vegetable oil
1 teaspoon vanilla extract
 
Mix the flour, spice, salt and baking soda and set aside.  In another bowl, whisk together the pumpkin, egg, sugar, oil and vanilla until smooth, then add the dry ingredients from the first bowl. Whisk just until well mixed and set aside.
 
CHEESECAKE LAYER
 
(2) 8 ounces cream cheese (room temperature)
2   large egg
4 teaspoons all purpose flour
2 cups powdered sugar
2 teaspoons vanilla
 

Beat the cream cheese with electric mixer until smooth, then add the egg, flour, sugar and vanilla and beat until smooth, but don't over beat.

ASSEMBLY

Super simple: place cupcake papers in cupcake pan and very lightly mist them with cooking spray.

Put a small amount of cake batter into each paper and make sure it covers the bottom. Top with cheesecake filling(dividing evenly between the 24 desserts).

Bake in pre-heated 350° oven for 25 minutes or until set (my electric oven takes exactly 25 minutes).

Cool to room temperature then chill for at least a couple hours.

NOTE:  These little gems can be made two or three days ahead of time which is a huge help during the holidays. As a matter of fact, they taste even more moist after a couple days in the fridge.  Just make sure that you store them chilled in an airtight container.

NOTE: This cake batter raises nicely, so don't put too much in the bottom of each one...sort of spread it around but not too terribly thick or you will get all cake and less cheesecake.

OVEN BARBECUED CHICKEN

I made this for the first time a couple of weeks ago and it was an instant hit with Picky-Picky husband. As a matter of fact, he gave it a thumbs up three times before the dinner dishes were done (that is almost unheard of).

Basted with a maple flavored barbecue sauce; this recipe produces a mildly sweet and sticky-yummy chicken. Served with biscuits and corn on the cob, it is a great way to enjoy barbecue flavor (indoors) during the fast approaching winter season.


Start with a nice big chicken; I usually buy whole chickens that are about 4 pounds.  I split it down the back (removing the backbone) so that you can lay it out flat; it cooks very evenly that way.
 
Place the chicken (rinsed and patted dry) in a baking dish and brush it with the following quick-mix sauce:
 
1/3 cup REAL maple syrup (not pancake syrup)
1/3 cup ketchup
1 teaspoon (dry) salt free seasoning (I use Penzey's)
pinch of cayenne pepper (more if you like heat)
generous quarter teaspoon black pepper
1/4 teaspoon liquid smoke
 
Mix well  and pour over the chicken, making sure it coats everything.  Bake at 350° for  90 minutes*, basting every 30 minutes or so.
 

Any kind of (dry) salt free seasoning will work,
we like the Penzey brand


Mildly Sweet and Sticky, just right!!
 
We like a whole baked chicken, but I'm sure this would
work well on a cut up chicken too.
 
 
NOTE: I bake four pound chickens (at 350°) for about 90 minutes, but the baking time for YOUR chicken depends on how big it is.


POT LUCK MINI CHERRY PIES

These "Grab-and-Go" mini cherry pies are perfect for large gatherings and family or church potluck dinners. The dough can be made days ahead and baked off when you have some "extra" time, which is a big help.

Guests (at least mine) seem to appreciate PIE at a potluck, but traditional pie can be messy to serve, especially for children. These little "two bite" beauties are perfect. This recipe makes 24 pies, but the recipe doubles easily.


CRUST

1/2 cup butter  (room temperature)
3 ounces cream cheese (room temperature)
1 cup flour

Mix with electric mixer (I use my stand mixer with paddle attachment) until you get a smooth dough. Wrap it in plastic and chill for about an hour (will also keep well in fridge for several days).

FILLING

(1)  14½ ounce can tart pie cherries packed in water
3/4 cup granulated sugar (divided)
2 tablespoons + 1 teaspoon corn starch
pinch of table salt
1/4 teaspoon almond extract (do not leave out)
1 teaspoon butter

Drain the cherries, reserving the liquid. Pulse the cherries in the food processor until fairly well chopped then drain again (I even press on the cherries a little to remove excess liquid): set aside.

 In a saucepan, combine 1/2 cup of the reserved cherry juice, HALF of the sugar, the cornstarch and a pinch of salt. Whisk till smooth and bring to a boil. When this mixture gets super thick (it will happen FAST once it starts to thicken), remove from heat and stir in the rest of the sugar, the chopped cherries, the almond extract and butter. Stir until well mixed; let cool while you form the crusts.

 Preheat oven to 375°. Cut the chilled dough into 24 pieces and roll each piece into a ball. Place one ball in each mini-muffin cup (no need to grease the pan).

Now, you have to use your fingers and push the dough across the bottom and up the sides of each mini-muffin space.  Better yet, if you have tart tamper or something similar, this step will go MUCH faster (just dip it in a little flour between each use).  I use the rounded end of the wooden tool that came with my Kitchen Aid meat grinder, it works absolutely perfectly. Try and get the crust edges just a little taller than the edges of each muffin cup (see 2nd photo).

Fill each mini-crust 2/3 full of the cherry filling. Bake at 375° for 20 minutes on the TOP RACK of your oven.   When the edges of the crust are light golden brown, they are done. 

IMPORTANT:
Don't try to remove the cooked pies from the pan right away. The filling stays hot for a while, so let them cool for a good 25 minutes or so. You can use a butter knife to help "lift" the pies out of the pan. 

BETTER YET: line the mini-muffin pan with mini-cupcake papers and that should solve any/all problems.

 
Delicious and FUN to Serve!!

MAPLE PECAN TASSIES

When our kids were little, I made these Tassie's ONLY on special occasions, or during the Christmas holiday. I'm not sure why that was "the rule", but it was.

These days, at our house, Tassie's have evolved into a barbecue "staple" for several reasons: not only are they super easy (and mess-less) to serve a crowd (especially the little ones), but you can make them a day (or even two) ahead of time, which is always handy.

I just set a tray of these beauties out on the buffet table, and guests "re-visit" it again and again; I guess their mini-size isn't as intimidating as a big old piece of pecan pie.

Tassie's Aren't Just For Christmas Anymore!!


PASTRY CRUST
1 cup unsalted butter at room temperature (see note)
6 ounces cream cheese at room temperature
2 cups all purpose flour

Cream the butter and cream cheese (with electric mixer) until it is light and fluffy. Add the flour and beat until the dough comes cleanly away from the inside walls of your mixing bowl.

Roll pastry into 1 inch balls and place them into an un-greased mini-muffin pan. Using your fingers, press the balls of dough into the bottom of each cup and up the sides. (I use the floured round end of my rolling pin to press the dough into place). Place the pan of shaped shells into the freezer for a few minutes while you make the filling.

FILLING
3 large eggs
3 tablespoons melted butter
1 3/4 cups light brown sugar
1 teaspoon vanilla
1/2 teaspoon maple extract
3/4 cup coarsely chopped pecans (see note)

Beat the eggs until very well mixed and lemon colored. Stir in everything else (except nuts) and whisk until smooth; set aside.

Put a few chopped pecans in the bottom of each pastry shell and add enough filling to fill the shell about 2/3 full. (see note)

Bake in pre-heated 375F oven for 20 minutes or until the pastry is golden and the filling is set, yet still a little soft in the center. Remove from oven and sit the pan on a wire rack for about 10 minutes before you try to lift them out. Lift Tassie's out of pan and cool on a wire rack.


NOTE: Keep in mind that the filling puffs as it bakes, so don't overfill the unbaked shells. If you overfill them, they will be hard to get out of the pans. If your Tassie's resist coming out easily, use the tip of a knife to help you "lift them" out of the pan.

UPDATE: The recipe that I've used for 35+ years, used butter in the crust. However, recently, I decided to try butter flavored Crisco and I was thrilled with the crust difference. The butter produces a very white and non-flaky crust, but the butter flavored Crisco produces a super-flaky golden crust that picky-picky husband loved. If you click on the following photo, you can see how nice and flaky this ingredient substitution turned out.

NOTE: If you do not have maple extract, just leave it out.

NOTE: Picky-picky husband is not a big nut eater, so I put minimal nuts in these when I make them. Even with the extra filling, they bake in 20 minutes.
 

Daily Categories

Powered by Blogger.

Blog Archive