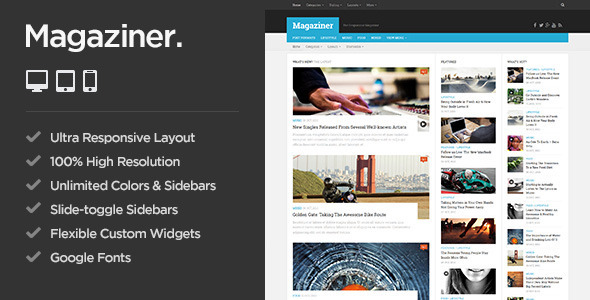
CV, CALENDAR, RESUME, LETTERS TEMPLATES


RUMS #18/15

Heute ist RUMStag!


In aller Kürze:
Gezeigt werden darf alles, was DU für DICH SELBER genäht, gestickt, gestrickt, gehäkelt, gebastelt, geklöppelt oder sonstwie gehandarbeitet hast und was du auf einem BLOG zeigst!
Du darfst dabei Werbung machen, auf Verlosungen hinweisen, Handstand machen oder ein Tanzvideo einstellen - nur Du solltest etwas zeigen, was DU ganz persönlich FÜR DICH selbstgemacht hast.

Du schreibst für diese Sache am Donnerstag einen Post, in dem Du zu RUMS verlinkst - und das als LINK und nicht als Text! Nur mit einem Backlink funktioniert die Verlinkung hier unter dem Post.


GRANNY's CREAM CHEESE POUND CAKE

Don't let this unassuming photo deter you from this recipe. This is, by far, one of the best cakes we've ever had. It is everything you want in a pound cake... it is tender, it has a very fine crumb, it is sweet, rich and buttery. Whether you are slicing it up for the perfect strawberry shortcake or serving it with a big scoop of ice cream, this is the perfect cake ...even for the most picky guests!!
At our house, we seldom even frost this, we just snack on it till it's gone.......it is THAT good.


1 1/2 cups butter at room temperature (important)
8 ounces cream cheese at room temperature(important)
3 cups granulated sugar
6 large eggs at room temperature (important)
3 cups cake flour
1/8 teaspoon salt
2 teaspoons vanilla extract
1 teaspoon coconut extract

In a LARGE bowl, with electric mixer, beat the room temperature butter for about a minute.  Add the room temperature cream cheese and beat for two more minutes (it should look light and fluffy). It is very important that both of these ingredients are at room temperature.

Gradually sprinkle in the sugar (while your mixer is running) 1/2 cup at a time; beat well.  Add the eggs, one at a time, beating well after each egg. Mix in extracts.

Measure out 3 cups of CAKE FLOUR and 1/8 tsp. salt, then sift it all.  Add slowly to butter mixture, on low speed, mixing well after each addition.

Generously grease AND flour a 10" bundt pan (don't use cooking spray)   Bake in preheated 300 degree oven for 1 hour 40 minutes, or till toothpick tests clean.


Fairly nondescript looking, but don't let that sway you.  The genius of this recipe is in the taste. The combination of butter and cream cheese makes this cake to die for moist and rich.

Let the cake cool, in the pan, for 15 minutes before you turn it out, then cover it with plastic wrap, directly on the surface of the hot cake, until it is completely cool. Frost as desired.


NOTE:  Yes, 300 degree oven is correct.

NOTE: Don't be tempted to grease your pan with vegetable spray. Make sure you grease and flour your pan well (tap out excess flour).

NOTE: Make sure you sift the cake flour. I know it is a pain, but cake flour tends to clump more than all purpose flour, so this step is important. You CAN make this cake with all purpose flour, but you won't get that very fine crumb that is so delicious.

ENJOY !!!

CHOCOLATE LOVERS CHOCOLATE PUDDING

If you love chocolate, as much as I love chocolate, I hope you will try this recipe. I have been perfecting it for a couple of years now, and the process has required a lot of delicious taste testing sacrifice on my part, but the end result is perfection: thick, ultra-chocolate-y, super rich and addicting....just right!!


2 1/4 cups milk (I use 2% milk, but any kind is ok)
1/2 cup whipping cream
1/2 cup brown sugar (I use dark, but light is ok)
3 egg YOLKS  (yolks ONLY)
3 tablespoons corn starch (very slightly rounded)(not heaping)
1 (11.5 ounce) bag milk chocolate chips
3 tablespoons butter (cut into pieces)
1 teaspoon vanilla

Whisk the brown sugar and corn starch together and set aside. This step isn't absolutely necessary, but if you do it this way, the cornstarch will not clump up or lump up when you add the milk. 

Whisk the cream, milk and yolks together in a saucepan that has a nice heavy bottom (it prevents scorching). Add the dry mixture to the wet mixture and whisk until smooth. Make sure you scrape the corners of the pan because the corn starch likes to "hide" there.

Cook on medium heat (stirring) until it gets thick and starts to bubble all over the entire surface of the pudding. TURN THE HEAT DOWN to a level where it still bubbles (but isn't going crazy) and cook/stir for another 30 seconds.

Remove from heat and add the butter, milk chocolate chips and vanilla; whisk until melted and smooth.
 
Now, if you REALLY want that super smooth and silky mouth feel, pour the cooked pudding through a mesh strainer, it REALLY makes a HUGE difference but isn't absolutely necessary.


Pour into dessert dishes and lay a piece of waxed paper or plastic wrap right on the surface of the hot pudding (this will stop any "pudding skin" from forming). Chill for at least 4 hours. Top with whipped cream and serve cold.
 
A NOTE ABOUT CHOCOLATE CHIPS: Any brand milk chocolate chips will work. I usually use Nestlé's or Ghirardelli chocolate chips and try to stay away from the waxy generic house brands of chocolate chips. But that's just my preference.

ENJOY !!

RUMS #17/15

Heute ist RUMStag!


In aller Kürze:
Gezeigt werden darf alles, was DU für DICH SELBER genäht, gestickt, gestrickt, gehäkelt, gebastelt, geklöppelt oder sonstwie gehandarbeitet hast und was du auf einem BLOG zeigst!
Du darfst dabei Werbung machen, auf Verlosungen hinweisen, Handstand machen oder ein Tanzvideo einstellen - nur Du solltest etwas zeigen, was DU ganz persönlich FÜR DICH selbstgemacht hast.

Du schreibst für diese Sache am Donnerstag einen Post, in dem Du zu RUMS verlinkst - und das als LINK und nicht als Text! Nur mit einem Backlink funktioniert die Verlinkung hier unter dem Post.


VINCENT AND THE NIGHT -book is now OUT THERE!


Mila is testing out the new book: Vincent and the Night, via Instagram


Read more about the book and find a place to buy it. 

PS, I rarely update this blog, I'm more active in Facebook and in www.adeleenersen.com


Zarja - Feminine Personal Wordpress Blog Theme

Zarja - Feminine Personal Wordpress Blog Theme - Personal Blog / Magazine

Zarja is a modern Wordpress Blog with an emphasis on feminine touch. Light and clear colors with the lovely design will proudly present your writing and your photographs.


Live Demo

Download

Magaziner - Responsive WordPress Magazine Theme

Magaziner - Responsive WordPress Magazine Theme - News / Editorial Blog / Magazine

Magazine theme:

Magaziner is responsive high resolution magazine, news & blog theme. With unique slide-toggle sidebars, the viewing and reading experience is fantastic on all devices. The magazine template is excellent for news, newspaper, magazine, blog and publishing.
Features

100% High resolution
– Awesome sharpness on retina screens and other high resolution devices. No compromise anywhere.
Extensive styling options
– Unlimited colors for comments bubble, accents, footer/menu and body background in seconds.
Ultra responsive
– This theme will scale down beautifully from a full hd resolution down to a low resolution mobile phone.
Flexible layout options
– Set 0-2 sidebars to the left, right or one on each side. Every page, post and also standard WP sections can be unique.
Toggle fixed-width sidebars
– The primary sidebar is always kept at a neat 300px. The secondary is 300px. Both are always rendered after the content in the code, no matter layout.
0-4 Footer widget columns
– Use anything from no footer widgets all the way up to 4 columns. A personal favourite is 3 columns for good space on all devices.
Almost zero images
– With Font Awesome, CSS and a modern flat look this theme manages to load only 1-3 images total for the whole layout, depending on layout choice.
Integrated share counts
– Sharrre is inlcuded which gives you high-res share buttons and counts for each article. Not a fan of social media? Just disable them.
Set the website max-width
– You choose how wide you want your website to be via the admin panel. With a neat numeric slider, it’s one click away. 1024px > 1600px.
Related posts & post nav
– Motivate your readers to explore more articles on your website with related posts and links to previous and next article.
Unlimited widget areas
– There is no limit to how many widget sidebars you can create. Each widget area can be assigned to a unique page, post or standard WP sections.
Post formats
– Easily show video, audio, image, gallery slider, status messages, links and more. All 10 formats supported.
Social links
– Easily add your own social links to your header and footer. Use any of 479 icons. Set a unique color for each if you want.
Font selection
– Choose from a list of some good-looking fonts supplied via Google Fonts. Latin Extended and Cyrillic options included.
Boxed layout
– Want a boxed layout style instead of full-width? It’s one click away in the styling options.
Footer & header ads
– Prepared footer and header widget areas for leaderboard ads can be enabled.
More Features

Backend theme options
– Great customization ability directly from the theme options panel without having to touch any code at all.
Good SEO
– The markup is search engine optimized to allow the best possible result for your website.
Straightforward code
– A WordPress theme code structure that is easy to work with. No layer upon layer with bloated code.
Custom built widgets
– Includes widgets to display responsive video, tabbed content, post lists and other neat features.
Custom logo upload
– Upload your own custom logo with a few simple clicks. No logo yet? Use the standard plain-text option.
Custom page templates
– Page templates for things such as a childpage menus are included. The layout options are many.
Cross-browser support
– Compatible with the latest versions of modern browsers – Firefox, Chrome, Safari, Opera and IE8 or 9+.
Localisation support
– Translate into any language you wish using the included .po/.mo files. Everything you need to get started
OptionTree framework
– Fully integrated OptionTree, a fantastic theme options framework that is easy to work with. Created by Derek Herman.
Full child theme support
– The theme has been built with child themes in mind. All functions and files are pluggable and easy to work with.


Live Demo 

 Download

Broadsword - Responsive WordPress Theme for Blogging

Broadsword - Responsive WordPress Theme for Blogging - Blog / Magazine WordPress

Easy story sharing with our simple responsive blogging theme!

Broadsword is a unique, beautiful, simple and responsive blog theme that makes sharing stories easy. This premium personal blog WordPress theme offers a minimal design with maximum appeal in a way that’s quick to set up and easy to use. With 4 unique and creative homepage layouts to choose from, Broadsword is professionally crafted to draw visitors in. The modern single-column post pages, with clean typography, keeps the focus on your content, while full width featured images, elegant CSS effects, and optional tiled image galleries help bring blog post entries to life.

Currently: Broadsword v1.3 – New Features + Customization options!
v1.3 launched on April 6 2015. We listen to all our customer’s feedback!


Live Demo

Download

RUMS #16/15

Heute ist RUMStag!


In aller Kürze:
Gezeigt werden darf alles, was DU für DICH SELBER genäht, gestickt, gestrickt, gehäkelt, gebastelt, geklöppelt oder sonstwie gehandarbeitet hast und was du auf einem BLOG zeigst!
Du darfst dabei Werbung machen, auf Verlosungen hinweisen, Handstand machen oder ein Tanzvideo einstellen - nur Du solltest etwas zeigen, was DU ganz persönlich FÜR DICH selbstgemacht hast.

Du schreibst für diese Sache am Donnerstag einen Post, in dem Du zu RUMS verlinkst - und das als LINK und nicht als Text! Nur mit einem Backlink funktioniert die Verlinkung hier unter dem Post.


ALMOND JOY BITES

This candy treat is very quick and easy to make and it tastes VERY much like an Almond Joy candy bar (only I think they are even better).

Just a few ingredients and no baking makes this recipe a real winner and they look so pretty. Great for gift giving or just for snacking.


1 1/2 cups shredded sweetened coconut
8 tablespoons sweetened condensed milk (NOT evaporated)
1/2 teaspoon vanilla extract
1/2 teaspoon almond extract

12 ounce bag of milk chocolate chips (see note)
1/4 cup toasted almonds (optional)(see note)

Put the coconut, sweetened condensed milk and extracts in the food processor and pulse until the mixture is finely chopped and thick and sticky.

Put 24 mini cupcake papers into a mini cupcake pan and set aside.

Melt the chocolate chips  (until smooth)in the microwave, on 30 second blasts (stirring well after each 30 seconds). My microwave took a total of about 75 seconds, or 2 1/2 blasts).

Spoon about 1 teaspoon melted chocolate onto the bottom of each mini cupcake paper and smooth it around a little.

Next, (using slightly damp hands) roll the coconut mixture into balls about the size of a small grape and  sit it on top of the melted chocolate later. Flatten ball (just a little) with you finger.

Top coconut ball with about 2 teaspoons melted chocolate. That's it!! 

Set the candy in the fridge for about 10 minutes to "set" the chocolate. It couldn't be easier!!!  Makes 24 candies.

NOTE: Any flavor chocolate chips will work. We like milk chocolate, but semi-sweet or dark would work well too.

NOTE: I don't put nuts in this candy, but if you want them, go for it. A whole toasted almond on top of the coconut layer works well.

NOTE: I keep these in the fridge, although it's not necessary. It just depends on how hot it is where you live.

ENJOY !!!

RUMS #15/15

Heute ist RUMStag!


In aller Kürze:
Gezeigt werden darf alles, was DU für DICH SELBER genäht, gestickt, gestrickt, gehäkelt, gebastelt, geklöppelt oder sonstwie gehandarbeitet hast und was du auf einem BLOG zeigst!
Du darfst dabei Werbung machen, auf Verlosungen hinweisen, Handstand machen oder ein Tanzvideo einstellen - nur Du solltest etwas zeigen, was DU ganz persönlich FÜR DICH selbstgemacht hast.

Du schreibst für diese Sache am Donnerstag einen Post, in dem Du zu RUMS verlinkst - und das als LINK und nicht als Text! Nur mit einem Backlink funktioniert die Verlinkung hier unter dem Post.


KID FRIENDLY SLOPPY JOES

Years ago, when our hungry teenage boys came home for dinner (with hungry friends tagging along) it was a challenge to feed them all with one pan of Sloppy Joe's. Unexpected "guests" at the dinner table were fun, but required some quick thinking, so I "stretched" this simple but tried and true recipe, by adding kidney beans, extra shredded veggies and cheese. It was always a big hit. Necessity is the mother of invention I guess, thank goodness for versatile recipes like this one.


 These days, with the kids all gone, I still make full size batches of Sloppy Joes but I freeze the extra in quart freezer bags. I put the leftover meat into the bag, removing as much of the air as possible, then patting the meat into a 1" thick flat shape before freezing it (this thin "disk" of Sloppy Joe filling thaws out quickly). I love "instant" meals like this. 

1 pound lean ground beef (I use 90% lean)
1/2 cup chopped onion
1/3 cup chopped celery
1/2 cup chopped bell pepper
1 cup shredded carrot
2/3 cup ketchup
1/2 cup water
2 tablespoons Worcestershire sauce

1/8 (to)1/4 teaspoon cayenne pepper (see note)
1 teaspoon salt
1/4 teaspoon black pepper
5 hamburger buns, split and toasted

Cook the hamburger and vegetables together until meat is no longer pink (chopping up the meat as it cooks) (drain meat well).

Stir in remaining ingredients (except buns). Simmer on med-low for about 20 minutes (to reduce the consistency of the sauce, but don't let it get too dry). Fill the hamburger buns with the beef mixture and serve.


NOTE: After this is cooked, it keeps well in the crockpot (on low) if your dinner hour is uncertain.

NOTE: I serve these with a slice of cheese under the meat mixture and a squirt of yellow mustard on top of the filling (our favorite).

NOTE: I make this with an 1/8 teaspoon of cayenne because picky-picky husband is VERY SHY when it comes to heat/spice in his food. If you like a little more spark in your sandwich, use 1/4 teaspoon.


ENJOY !!!

RUMS #14/15

Heute ist RUMStag!


In aller Kürze:
Gezeigt werden darf alles, was DU für DICH SELBER genäht, gestickt, gestrickt, gehäkelt, gebastelt, geklöppelt oder sonstwie gehandarbeitet hast und was du auf einem BLOG zeigst!
Du darfst dabei Werbung machen, auf Verlosungen hinweisen, Handstand machen oder ein Tanzvideo einstellen - nur Du solltest etwas zeigen, was DU ganz persönlich FÜR DICH selbstgemacht hast.

Du schreibst für diese Sache am Donnerstag einen Post, in dem Du zu RUMS verlinkst - und das als LINK und nicht als Text! Nur mit einem Backlink funktioniert die Verlinkung hier unter dem Post.


Daily Categories

Powered by Blogger.

Blog Archive